Plan a Flawless Bathroom Remodel Timeline for 2025
If your bathroom feels more like a time capsule than a relaxing retreat, you might already be dreaming about a remodel. Perhaps you have collected tile samples, pinned shower ideas, or priced new vanities. Before swinging a hammer, establish a realistic timeline. A bathroom remodel involves many moving parts, and one delay can affect the entire project. With smart planning, keep the renovation on track, reduce stress, and enjoy the process.
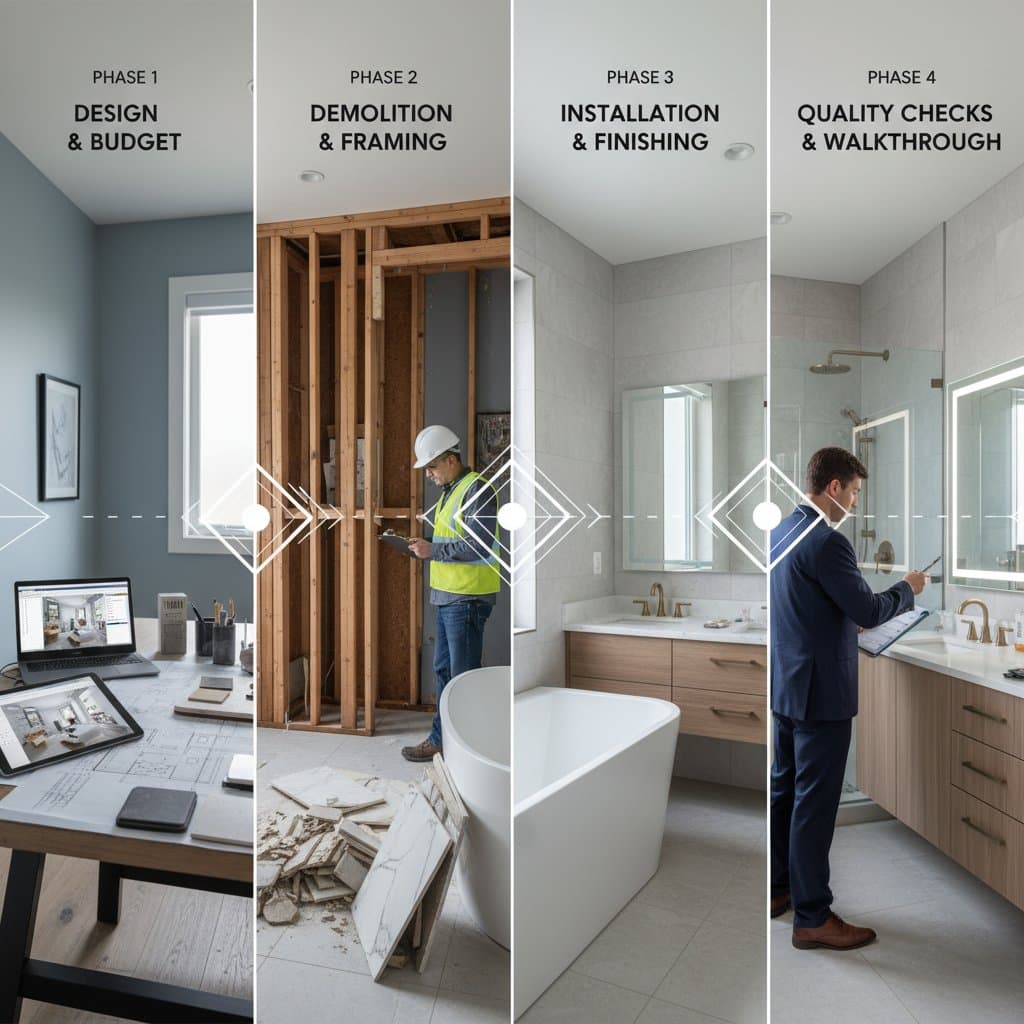
This guide outlines how to plan a flawless bathroom remodel timeline, from inspiration to final polish. Learn to balance ambition with practicality, allocate time for each stage, and make confident decisions that ensure smooth progress.
1. Planning and Design Phase
Start with a clear vision to guide the project. Assess your current bathroom's layout, identify pain points like poor lighting or inadequate storage, and gather inspiration from magazines or online sources. Sketch rough layouts or use design software to visualize changes, ensuring the space supports daily routines while incorporating desired features such as a rainfall shower or double vanity.
Timeframe: 2 to 4 weeks
Typical costs: Design tools and consultations range from $200 to $1,500, depending on complexity.
Key steps:
- Evaluate space constraints and measure dimensions accurately
- Create a mood board with colors, materials, and fixtures
- Consult with a designer if needed for custom layouts
- Finalize a detailed blueprint that includes electrical and plumbing adjustments
Pro tip: Focus on versatile designs that accommodate future needs, such as aging-in-place features like grab bars or zero-threshold showers. This approach enhances long-term value.
2. Budgeting and Permitting Phase
With a design in hand, establish a budget and obtain necessary permits. Homeowners often overlook costs for hidden elements like plumbing reroutes or ventilation upgrades. A realistic budget prevents the project from halting midway.
Timeframe: 1 to 3 weeks
Typical costs: Permit fees vary from $50 to $600 based on location and project scope.
Key steps:
- Develop a line-item budget covering labor, materials, and a 10 to 15 percent contingency for unexpected issues
- Identify required permits for plumbing, electrical, or structural modifications
- Submit applications promptly to sidestep delays
- Collect bids from contractors and align schedules
Budget ranges:
- Cosmetic refresh: $3,000 to $8,000
- Mid-range remodel: $10,000 to $20,000
- Luxury redesign: $25,000 and above
Pro tip: When reviewing bids, evaluate not just price but also included scope and proposed timelines. The lowest bid might exclude essential preparation or use subpar materials.
3. Demolition and Preparation Phase
Preparation clears the way for new installations. This stage involves removing old fixtures, tiles, and potentially walls, while protecting adjacent areas from dust and debris. Careful execution here sets a strong foundation and reveals any underlying issues like water damage or outdated wiring.
Timeframe: 1 to 2 weeks for standard projects, extended for extensive demolition.
Typical costs: Labor and disposal fees account for 10 to 15 percent of the total budget.
Key steps:
- Shut off utilities and cover floors, vents, and doorways
- Remove fixtures, cabinets, and surface materials systematically
- Inspect subfloor and walls for repairs needed
- Dispose of debris responsibly through rental bins or services
Pro tip: Hire professionals for demolition if structural elements are involved, as improper removal can lead to costly fixes. Document the process with photos for reference.
4. Construction and Installation Phase
After demolition and preparation, reconstruction commences. This period covers plumbing rough-ins, electrical wiring, drywall application, flooring, tiling, and fixture placement. Effective coordination among trades ensures each step builds on the previous one without interruptions.
Timeframe: 3 to 6 weeks for typical remodels, with additional time for intricate designs or custom elements.
Typical costs: This stage typically represents 60 to 70 percent of the overall budget.
Typical order of work:
- Plumbing and electrical rough-ins
- Insulation and drywall installation
- Waterproofing and floor preparation
- Tile installation
- Vanity, toilet, and shower placement
- Lighting, mirrors, and accessory fitting
Pro tip: Complete tile and painting tasks prior to installing final fixtures. This method allows for precise edges and minimizes damage risks in an open space.
Balancing DIY and Professional Expertise
Decide between self-managed tasks and professional involvement based on skill level, available time, and financial considerations. A combined strategy frequently yields optimal results, leveraging personal effort where feasible and expertise where essential.
Suitable for DIY:
- Painting walls and ceilings
- Mounting towel bars, mirrors, and accessories
- Applying simple tile backsplashes
- Updating faucets or hardware
Best handled by professionals:
- Plumbing and electrical modifications
- Waterproofing and shower base installation
- Significant structural alterations
Financial advantages:
Self-directed work can reduce labor expenses by up to 40 percent, provided appropriate tools and time are available. Engaging licensed specialists guarantees adherence to building codes and provides warranties, particularly for critical systems like plumbing and electricity.
Pro tip: Consult your contractor on boundaries for partial self-involvement. Many allow homeowners to manage cosmetic finishes after technical phases conclude.
Ensuring Quality Through Inspections
Prior to declaring the remodel finished, conduct a thorough walkthrough. This process identifies minor flaws that could evolve into persistent problems if overlooked.
Essential checks:
- Even grout lines and secure caulking
- Sealed fixtures without leaks
- Uniform tile alignment
- Functional lighting and electrical outlets
- Smooth operation of doors and drawers
For contractor-led projects, arrange a joint final inspection. Record observations, resolve any adjustments, and obtain details on warranties for workmanship and products.
Strategies for a Successful Remodel
A bathroom remodel demands organization, yet a structured timeline makes it manageable and gratifying. Experienced homeowners recommend these approaches:
- Emphasize functionality over aesthetics initially. Attractive tiles lose appeal in an inefficient layout or without sufficient storage.
- Maintain adaptability in material selections. Substitute backordered items with comparable options to preserve momentum.
- Record installations meticulously. Photograph plumbing and wiring before enclosing them to aid future repairs.
- Organize receipts and warranty documents systematically. This preparation simplifies handling any subsequent issues.
- Acknowledge progress points. Pause to appreciate achievements, such as completed tiling or illuminated vanities, to sustain motivation.
Maximizing Comfort in Your Revitalized Bathroom
Your completed bathroom now serves as a serene, efficient sanctuary tailored to your lifestyle. Regular maintenance, including prompt attention to grout cleaning and fixture checks, preserves its appeal and performance. Enjoy the enhanced daily rituals in a space that reflects both practicality and personal style.