Home

Draperies in Your Kitchen

I ‘ve drilling blinds within my kitchen flat. I am not likely to modify out them per the the guidelines of my lease but I Have been considering adding drapes to make my retro- kitchen slightly warmer and much more.

Perhaps I believe that kitchen windows should have drapes around them because that is what I was raised with. The kitchen had lacy drapes with the intriguing layout – completely covering the bottom-half of the window but just covering about about 50% of the highest part of our windows. After these altered out with red drapes that were more vivid and that I believe she is been thinking about altering them again recently to match her flavors that were newer.

There are a lot of choices for kitchen curtain style. You can opt for a light and ethereal lacy drape, a fashionable burlap drape or a thick curtain that shuts out the light (even though why anybody wishes to shut out light in a kitchen I Will never understand!)

What kinds of drapes would you enjoy in your kitchen?

Rob Kane – Kitchen Interiors Inc.

Fitting the draperies in the kitchen as well as dining room is an excellent strategy to bring both of these spaces in relation to decor.

Susan Serra

I’m a big supporter of the design that just covers so or the best quarter of a kitchen window. Kitchens do not usually want they do want all of the natural sun light that you can maybe let in and the solitude of total drapes.

Needless to say, there is always the possibility of having blinds or drapes on complete drapes hanging above so as you are able to moderate your degrees of solitude and the window it self. That is an excellent pick in houses where the kitchen as well as dining locations are mixed.

For those who have several windows in your kitchen/eating region you then can truly fantastic a superb cosmetic appearance using symmetry and fitting. The personal drapes around each full length window here, topped off be their ornamental tops, coming-together to seems elegantly amazing.

Chris Kauffman

It is uncommon to find out full length drapes in the kitchen. For those who are in possession of a sliding-glass do or in your home, nonetheless, this can be a good alternative. Can you pick heavy drapes such as some thing or these lighter? I had go with lighter.

In order that they do not obstruct the sun you always have the option to tie up your drapes on the windows. This offers the area with an excellent touch while preserving its total functionality.

Susan Serra

Curtains in the kitchen can provide a great nation that is female feel to your house. This will function as correct design choice for you personally should you be the kind of girl who adores the nostalgia of akitchen then.

Jennifer Gray Insides Design & Colour Specialist

Burlap is a fashionable material for kitchens, giving a Oldworld sense to them. Get drapes to fit to modernize this pattern.

Ellen Kennon Style

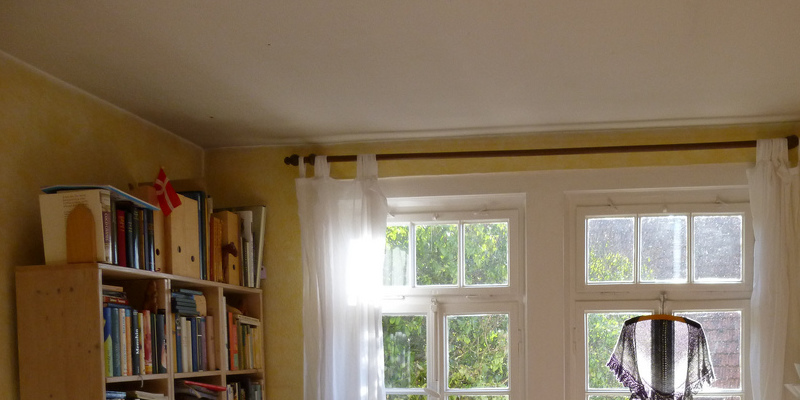
Yellow in akitchen is consistently an excellent notion. It generates the complete room light and warm. The kitchen drapes are a perfect spot to make use of this colour.

Home

Methods for Decorating around a Piano

My grandma gave us her piano, once I was a child. It sits in my parents’ front room now. Occasionally it is an eye sore and at times itis a charming element of the decor. It certainly depends what is happening in the area at that time.

Our pianoforte is a wood piano. This can be not bad for their their property because my dad is a woodworker and there are several wood touches through the area. This helps to give a look to it also tie the entire space together.

Basically were going to buy my own piano, I’d likely pick a black layout. This goes nicely in nearly every room. Moreover, I really like decoration in white and black and the black and white of the pianoforte would make this an ideal area of the chamber’s layout for me personally.

Regardless of the kind of piano which you have, it may be rough to enhance around it. Itis a bit that is big so that you should create it the center piece of the area. Nevertheless, you might want in order to incorporate it right into a multipurpose room. Learning some fundamental layout magic tricks will allow you to try this.

PMWArchitects

One clever rule to follow along with will be to maintain a largely black and white layout round the pianoforte except to a DD bursts of shade someplace in the chamber. I occur to believe that there exists a a bit an excessive amount of colour in this one. Nevertheless, some daring black and white prints on the wall would balance out this chamber flawlessly.

Mahoney Architects and Interiors

Here is a good example of the manner that white and black colours actually function using a pianoforte. The tile on the wall delivers it along with the glow black of the instrument and here gives an excellent emphasis to the area.

Consider placing your piano in an area with tile flooring. A lot of people adhere on their pianos together with carpeting. Yet a mo Re formal presentation is given by a tile flooring to the enjoying of songs on the piano.

Frederick Gibson + Associates Architecture

If your tile area is not also hot for you afterward a chamber in this way would have been an excellent compromise. You nonetheless get the tile result that is fantastic. Yet the carpets that are downy make the area warm and cosy – ideal for sitting on while appreciating the audio.

Doma Architects, Inc.

Incorporate the pianoforte together with the remaining living area but utilizing the best of it showing off alternative groups or pictures.

Billinkoff Architecture PLLC

You’ll need to believe cautiously about the layout of the one that you select in the event you do not previously have a piano. A lot of people get a piano that is conventional. Yet a piano using a distinctive contour or a wood piano might better match your present decor.

Tomar Lampert Associates

Does a piano that is great remind you of a time that’s gone? In that case you then should decorate the area around it to represent the magic of the age. The vintage-inspired furniture and drapes that are splendid here consider you straight back to some time when audio was the main type of entertainment in the house.

Willman Interiors / Gina Willman, ASID

Obviously, a pianoforte could work in a space that is contemporary at the same time. In this instance, the chamber continues to be decorated as the straightforward piano as well as a device is only one piece of the space that is complete.

Pepe Calderin Layout- Contemporary Interiordesign

Individuals who play with the pianoforte and the pianoforte regularly appreciate the arts all. Let your songs area reveal this. Select furniture that is superb, beautiful graphics and sculptures that are fine to enhance the the area around your piano that is fantastic.

Vinci | Hamp Architects

A pianoforte may additionally be an indicator of culture interests that are more extensive. That is reflected by this chamber. The artwork on the partitions, the publications, the the area for dialogue, the memorabilia from travelling for performing different jobs all bond in a single room to permit greatest imagination as well as the dining table.

Home

DIY Jobs: Modernizing Your Hearth

Houses with fireplaces that are functioning are excellent – there is nothing nothing like sitting by a fireplace on a chilly night. Nevertheless, an old hearth brings down an area way.

Modernizing a hearth is a simple job, or an important one – it all depends upon the hearth as well as your anticipations. Here are a few thoughts for modernizing your hearth – from straightforward to, properly, not-so-simple:

1. Enhance. The simplest way to provide your fireplace a fresh appearance is by increasing the mantel. Show a group that is modest, add blooms, or display pictures off – they will attract the attention from the hearth itself.

2. Clear. Occasionally all an older mantel needs is a little clean-up. This is a time consuming procedure, and also you need to be careful to make use of cleaning items that are proper, but you never know what treasures you will locate under levels of carbon black.

3. Paint. The next thing after clean up, a fresh layer of paint on a wood mantel can spruce up an entire room.

4. Simplify or include detailed architecture. It Is an enormous job, but in the event you are really detail-oriented (or possess a gifted friend or contractor), including depth to an easy mantel (or subtracting it from some thing overly active) makes to get an enormous change.

5. Totally revamp. a fresh facade of rock, tile, marble or wood is an enormous job, but in addition makes a huge difference, and will provide the entire room a facelift. Mantels that are reclaimed in many cases are offered by architectural salvage homes. For jobs that are larger, it is sensible to locate a contractor with hearth encounter.

Include your own personal suggestions in the opinions, or consider the conversation over to the buzz board – each month, the most effective design suggestion or tale (connected to this or another house design job) will win a $50 giftcard to your one of several house design shops (more particulars here). The competition of September is on until the thirtieth. All the best!

CWB Architects

A sleek facade in awesome grey anchors this chamber’s modernity.

Harrell Remodeling, Inc.

Combining media – like wood and tile – provides curiosity.

CWB Architects

This marble mantel that was first cleaned was eliminated and re installed by the contractor.

Doug Burch

When including a completely new hearth, it is possible to experiment with dimensions and contour.

A fairly small set is the fastest method to decorate a hearth.

Hanging tapestries (Xmas stocking-design) also can appear quite cool.

pierre senechal

This conventional hearth needs is attentive cleaning and stored clean by paint.

Urban Earth Style

This outside hearth is given a normal by a rock facade, but appearance.

Design Studio -Teri Koss

Modernizing the appearance of a hearth that is whole does not cease with the mantel – it can additionally contain the chimney.

Home

Bloggers giveaway presents and interview show

This is an excellent joy to present you to their lovely houses as well as our favourite house design bloggers.

S O far we’d highlighted ten houses in the bloggers interview show and want to thanks for the excitement and opinions.

Some of you’ve questioned in regards to the giveaway presents the bloggers pick within their interviews. Every week we’re requesting the blogger we interview, to decide on a giveaway present that he or she enjoys. It is almost always an item the bloggers would adore to get for his or her house one day, or have in their own residence. Anyone who remarks on an interview that is particular is not ineligible to win the present chosen on such an interview. Our give away present victor are arbitrary (we’re utilizing random.org to decide a winner) as well as the winner is notified via e-mail, so please be sure to are in possession of a valid e-mail in your houzz account.

we’re expecting to presenting you to more style bloggers as well as their houses. Stay tuned in order to find out whose home is showcased in our blogger inteview.

Urban Outfitters

Urban Outfitters’ tree Flagstaff shower curtain chosen to Inspire by Kim Johnson from Want.

Victor: vintagejones, Might 2 4, 2009

it is possible to see the entire interview here: http://www.houzz.com/ideabooks/2994/listing/Houzz-interview—Kim-Johnson—s-eclectic-house

Z Gallerie

Shell calms, chosen from This by John and Sherry Youthful Home.

Victor: valwills, Might 3 1, 2009

it is possible to see the entire interview here: http://www.houzz.com/ideabooks/3142/listing/Houzz-interview—Sherry-and-John—s-charming-make over

ABC Love print chosen from chi and ish by Vivian.

Victor: kapachino8, June 7, 2009

it is possible to see the entire interview here: http://www.houzz.com/ideabooks/3320/list/Houzz-interview—Vivian—s-delightful-Sydney-home

Macy’s

Martha Stewart Selection: Whiteware Cake Stands

Two Martha Stewart Cake Stands, chosen by Mrs. Lime Stone from BrooklynLimestone.

Victor: inthetweeds, June 14, 2009

it is possible to see the entire interview here: http://www.houzz.com/ideabooks/3552/listing/Houzz-interview–Brooklyn-Lime Stone-inprogress

Anthropologie

LULEA APRON is ’sed by Anthropologie.

Victor: whimsicalcottage, June 2 1, 2009

it is possible to see the entire interview here:
http://www.houzz.com/ideabooks/3800/list/Houzz-interview–Kim—s-colorful-daisy-cottage

Aged wood White Flower Farmhouse Stool, chosen by Layla from The Lettered Bungalow.

Victor:tschryver, June 28, 2009

it is possible to see the entire interview here:
http://www.houzz.com/ideabooks/4005/list/Houzz-interview–Layla-s-Romantic-Lettered-Cottage

Etsy

Family print and buttons from Chez Larsson.

Victor: jjordao, July 1 2, 2009

it is possible to see the entire interview here:
http://www.houzz.com/ideabooks/4390/list/Houzz-interview–Chez-Larsson-s-beautiful-Stockholm-house

Etsy

Tea towels, chosen by Victoria from sfgirlbybay were divine by classic.

Victor: janei, August 9, 2009

it is possible to see the entire interview here:
http://www.houzz.com/ideabooks/5071/list/Houzz-Interview–Victoria-s-bohemian-modern-home

Hudson Products

Classic lemonade clock,
chosen by Rhoda from Southern Hospitality

Victor?

for your own opportunity to win this classic clock opinion on this particular interview by Sunday, August 16th at 5pm EST.

You can read the complete interview here:
http://www.houzz.com/ideabooks/5293/list/Houzz-Interview–Rhoda—s-Southern-Hospitality

Etsy

Rosette Pillow, chosen by Kirsten from Just Grove.

Victor?

for your own opportunity to win this rosette pillow opinion on this particular interview by Sunday, August 23th at 5pm EST.

You can read the complete interview here:
http://www.houzz.com/ideabooks/5479/list/Houzz-Interview–Kirsten-s-vintage-glamour-style

Home

Read All about It: Publications as Design Elements

My love of novels goes far beyond simply the phrases inside of these, although I adore to study. I believe they dress up almost any room and ’re quite appealing. Plus, they got the additional plus of providing guests a little interesting insight to the house’s possessor. I really could spend hrs exploring other folks’s coffee tables and bookshelves.

Here are a few of the best methods to make use of books as a layout component:

Dirk Denison Architects

I am a massive lover of large, open areas, but they could be wild – not to mention which they frequently lack space for storage. A chamber breaking up bookshelf, like this one, solves both issues, including storage while breaking the the area into manageable “chambers” without giving the open experience.

SLADE ARCHITECTURE

I really like the traditional (and sensible) contact of a library ladder. While I frequently consider libraries as conventional surroundings, this space shows they can be innovative and contemporary, also.

CWB Architects

Built in bookshelves really are an excellent solution to make the most of storage space. This small nook is excellent – it packs into a miniature space. Plus, the view in the stairway – shelves packed with books – is not really unpleasant.

Klopf Architecture

The best thing relating to this chamber is in the corner – the bookshelves that are unfixed. I have noticed these in lots of cool insides recently and that I enjoy how they showcase the publications without diverting from other layout components or using up much room.

Deborah Berke & Partners Architects LLP

I will confess it: I am a sucker for an Eames couch. But I actually like these bookshelves, which unite shelving to home publications that are quite with coated areas to conceal a wreck. Itis a combination that is great.

Valerie Wills Interiors

Publications greeted me and after I walk into someone else’s house, I understand I Have met with a brand new friend. This tableau is easy – never overwhelming – but it retains publications in the limelight.

casamodern.com

These built-ins are not impractical but also extremely adorable. In an area this bright, publications may be also significantly, but in mild wood, as well as as they are setback a bit, they enhance rather than deflect.

casamodern.com

Publications or no, I really like this child’s area – it is interesting and not therefore dull. I particularly enjoy, however, how the shelving that is organizing functions as novel storage.

Buttrick Wong Architects

It is unnecessary to show 1000s of publications to create a style assertion. In this chamber, curiosity is added by one straightforward publication on the coffeetable without litter.

Axis Mundi

Just like the picture above, this chamber is straightforward and clean, while revealing novels away to their greatest benefits.

Vinci | Hamp Architects

This picture sums up my favourite method to show publications – in combination with objets d’arts. These active lots of novels are totally balanced by clean -affected sculptures.

Home

The way to Troubleshoot an Admiral AAV8000AWW Washing Machine

Admiral’s model number AAV8000AWW top-loading washing machine, sold on the house appliance market in the very first decade of the 2000s, features such whistles and bells as a fluid bleach dispenser, a fingertip faucet, an otherwise automatic lint filtering system along with an unbalanced spin load compensator. Features aside, every washer is prone to the occasional hiccup, and the AAV8000AWW isn’t a exception. Whether you have a two-speed or four-speed model, fundamental, manufacturer-recommended troubleshooting hints help you redress common problems before turning to technicians.

Water Worries

If your Admiral AAV8000AWW doesn’t fill with water in any way, you might have a power problem. Make sure the machine is securely plugged to a usable outlet, and check your fuse box to get a blown fuse or tripped breaker. To encourage water flow, straighten out bent inlet seams and start your water faucets fully. If your clothes come out of the machine dripping wet, then this implies you have an unevenly distributed load. Although the AAV80000AWW features an unbalanced load vendor, you might need to correct some unbalanced piles by hand; spread your clothes in order that they fill the drum as evenly as possible. This particular model provides one three water-resistant options; to get best results, use the “Hot/Cold” atmosphere for heavily mediated and color-fast items, “Warm/Cold” for moderately messy or long-lasting press items along with “Cold/Cold” for bright colors and woolen fabrics.

Cycle Complications

Besides ensuring machine is drawing electricity, ensure that your Admiral AAV8000AWW’s lid is totally closed throughout the agitation and spin cycles; built-in security features halt the unit from functioning unless the lid is protected. Kinked drain seams may additionally prevent your washer’s spin cycle, so straighten them out as necessary. Sometimes, excess suds stop the machine from spinning. To redress this, rewash your load without detergent. If you find your clothes still have stains following washing, then utilize the AAV8000AWW’s Stain Cleaner cycle, then which soaks clothes for 30 minutes to work out stubborn stains.

Added Errors

To address minor leaks, tighten the washing machine’s hose links, avoid soaking your clothes for over half an hour at one time or lessen the size of the load. If your Admiral AAV8000AWW makes lots of noise during surgery, even out your load’s distribution. If your Admiral washer is not dispensing bleach properly, remove the bleach dispenser from the cylindrical agitator, situated in the center of the drum, and soak the dispenser at a mixture of warm water and fluid detergent for a single hour. Rinse and shake the dispenser to remove buildup and then reinstall it atop the agitator. In some instances, the AAV8000AWW’s built-in overload agitator automatically closes the washer down if the load is too heavy. If this happens, reduce the load and try restarting the drier.

Tracking Down Technicians

Mechanical problems that reach beyond simple troubleshooting measures require help from professional, manufacturer-endorsed technicians, but you could have a challenging time tracking down Admiral’s service division because the company, originally based in 1934, has altered hands a couple of times throughout the years. Admiral was bought by Maytag in the 1990s, and Maytag was acquired by Whirlpool in 2006. For additional support, contact Whirlpool at 1-866-2538 or via the live chat system hosted on the company’s official site.

Home

The way to Divide a Room With Bamboo-Style Curtains

If you reside with family members or roommates, carving out some personal time might feel as a challenge. Having a room divider, you are able to segment off a spot in your house that’s free from prying eyes. Store-bought dividers look nice but might be pricey. If you’re on a budget, you’ll save money by producing your own divider with bamboo-style curtains. Prepare the divider by mounting it on facilitates drilled in the walls.

Hold a stud finder against a wall, then gradually run it on the wall. The stud finder will beep, light up or move if it finds a stud.

Use a pencil to mark the spot on the wall where you want the curtain pole to go. Make 1 mark on all sides of the wall to help you mount the pole evenly.

Drill a pilot hole through the wall and stud with a handheld electric drill and little bit. Hold the drill steady and keep it straight. Push the drill bit into the wall securely but don’t press too hard. After the little won’t go further, pull it out of the hole. Dust off any debris which built up around or in the hole. Duplicate drilling for another side of the wall.

Hold a steel or wooden curtain-rod support around the wall. Align the support’s screw holes with the pilot holes you just drilled.

Insert a screw that fits the hole you drilled. Tighten the screw with a screwdriver. Repeat this with the help on the other side of the wall. When you’re done, then the supports shouldn’t wobble or feel loose.

Hang the bamboo curtains on the curtain pole. Rest both ends of the pole in the supports on each side of the wall.

Home

Loose Cord to a Chain Saw

Beginning a chain saw requires you to pull securely and quickly on the cord to engage the engine. After the cord is loose, nevertheless, it can create starting the chain hard. A loose cord might also permit the starter handle to dangle in a manner that causes it to get on your way while operating the chain saw. Since replacing or repairing a loose cord is not a major repair, feel free to tackle the job yourself.

Loose Cord Causes

Advanced age in the series saw and regular use are often enough to noticeably loosen a starter cord. A faulty inner spring at the recoil mechanism or a frayed or stretched string are other triggers. It’s likely nothing you have done; a loose starter cord is merely something that occurs over time. Drop-starting the chain saw, an dangerous beginning method in which the consumer permits the chain saw to drop rapidly while pulling on the starter cord, may create the cord to loosen. Never use this way of starting the chain saw under any circumstances. It’s hard on the chain saw and is possibly fatal to you.

Obtaining the Starter Cord

For the bottom of the cause of a loose starter cord, you’ll have to detach the housing that holds the starter cord in place on the face of the chain saw. Use the proper type of screwdriver, normally a flat-head or Phillips-head model, to remove the screws that attach the housing to the chain saw. Inside the housing, you’ll find a spool about which the starter cord is wound. The spool contains a spring that tightens as you pull on the cord.

A Simple Fix

Generally, a loose cord only needs to be rewound around the exterior of this spool. To rewind the spring, hold the starter housing face up on your left hand and allow the starter cord and attached handle dangle under it. Slide the tip of a screwdriver under the section of the cord that is within the housing at which emerges from the spool. Pull up the cord and wind it around the spool a couple of times to tighten it. Examine the tautness of the starter cord by giving it two or three pulls and ensure that it retracts completely because it did when it was fresh. Then, reattach the housing to the side of the chain saw.

Spring Problems

When the simple fix does not work and the inner spring seems to be the issue, it is time to make a decision. Many experts advise having the spool serviced by a professional in this scenario, particularly when you’re not knowledgeable about disassembling and reassembling the starter unit that contains a possibly injurious spring. Should you make the decision to make this repair yourself, wear safety goggles to reduce your chance of injury in the event the pressurized spring hurtles out of the unit at a higher rate of speed.

Home

How to Attain Idler Pulley in a 2010 Bolens 38 ” Mower Deck

Bolens riding lawnmowers are produced by the MTD company. Meanwhile, the 2010 Bolens 38-inch mower is equipped using one idler pulley and two blade spindle pulleys the mower deck belt rides on to power the mower deck. Rust and corrosion certainly are typical causes of idler pulley bearing failure, which demands replacement of the mower deck idler pulley.

Park the riding lawnmower on a hard, level surface and engage the parking brake to keep the mower from moving while you work. Disengage the blades and then turn off the engine. Disconnect the rubber spark plug boot and wire from the spark plug, and then remove the spark plug in using a socket wrench to ensure the motor can’t accidentally begin while you work.

Fix the mower deck to the bottom place, with the lever on the right, rear fender, to access the mower deck belt and belt pulleys.

Unscrew the mower deck drive belt Flush rod keeping bolt with a socket wrench. Pull the mower deck belt keeper rod from the rod’s frame hole; mark the belt Flush rod hole with a marker to use as a reference when re-installing the rod.

Slip the mower deck belt from around the motor crankshaft drive pulley by hand. Pull the belt toward the top rear of the mower deck. Slip it from around the deck idler pulley, and the left and right side mower deck blade pulleys. Pull out the belt away of between the mower frame and deck, pulling slowly to ensure it doesn’t snag on any other parts in the procedure.

Spray penetrating oil across the surface and bottom-side idler pulley bearing hub to loosen the hub bearing from the idler arm mount beam. Allow the oil to soak in the hub for 15 to 30 minutes to enable the parts to loosen.

Insert the square end of a ratchet wrench to the square hole in the idler pulley bracket. Turn the wrench setting knob to the “tighten” place to hold the idler pulley bracket set up when loosening the idler pulley retaining bolt.

Loosen the mower deck idler pulley retaining bolt with a socket wrench while holding the idler pulley bracket in place with the ratchet wrench. Remove the idler pulley from the idler arm bracket beam by hand. An automotive pry bar may be needed if the beam is stuck or obstinate. Slide the bar between the bottom-side idler pulley and idler pulley bracket. Push the pry bar handle down slightly to lift the idler pulley from the shaft. Pry the idler pulley, working across the pulley evenly, to loosen it from the beam.

Slide the new idler pulley onto the idler arm bracket beam. Turn the ratchet wrench setting knob to the “loosen” place to hold the idler pulley bracket in place when hardened the idler arm pulley retaining bolt. Hold the ratchet wrench with one hand and then tighten the idler arm pulley retaining bolt with a socket wrench.

Fit the mower deck belt across the left blade pulley, ideal blade pulley and the mower deck idler pulley. Pull the belt toward the front of the mower deck and then place the belt across the motor crankshaft push pulley. Push the mower deck belt Flush rod in the riding lawnmower frame hole. Tighten the rod using a socket wrench.

Screw the spark plug in the riding lawnmower motor cylinder head with a spark plug socket and socket wrench, and reconnect the spark plug cable. Start the riding lawnmower. Push the mower around slowly while stopping and starting the mower blades to be sure the idler pulley, belts and blades function properly.

Home

How to Assemble Picture Frame Corners

Whether your picture frames are made from steel or wood, they won’t appear good if the corners are not tightenough. Constructing the corners of plastic and metal frames usually is not tough because all you have to make them tight includes the frame kit. It is a little more challenging to get tight corners when you are assembling a wood framework, particularly if you made the framework yourself.

Metal and Plastic Frames

Plastic and metal picture frames normally arrive with L-brackets, and although the frames have written assembly directions, the procedure is self-explanatory. You assemble the whole frame with its inverse side facing you, add a bracket in every corner and use the screws that have the frame to secure the brackets. The holes at the brackets along with the frame will be pre-drilled and aligned to create a gap-free corner when you yourself tighten the screws. You rarely have to reinforce the corners on plastic or metal frames with adhesive; the brackets do all of the work.

Cutting Miters

If you purchased a wood picture frame in the store and only have to assemble it, you shouldn’t need to worry about cutting the corners. If you are creating yourself the frame, nevertheless, you need to miter each end of each of the four portions of the frame in a 45-degree angle. It is ideal to do this with a power miter saw. If all you need is a hand saw or table saw, nevertheless, you should construct a jig to guarantee a true cut. A plywood square with a board screwed onto it in a 45-degree angle will hold the wood at the appropriate angle while you cut flush with the edge of the plywood.

Gluing the Frame

When the ends of the frame parts are correctly mitered, they fit together tightly, and after spreading wood glue on every joint, you can hold the whole frame together with a corner clamp. This metallic clamp fits around the framework, and you’ll be able to tighten it in 2 directions to draw the framework together and carry it till the adhesive sets. Some woodworkers prefer to add an additional C-clamp on every corner to keep the leading edges flush. All the clamps you use will compress glue in the joints; clean this with a moist rag while it’s still moist to prevent extra sanding.

Reinforcing the Joints

The simplest reinforcements for your corners are brads or end nails taken to the wood with a brad nailer or tapped in with a hammer after the adhesive has put. You can use screws; a few framers countersink the screws and then cover them with plugs. Hardwood splines are just another solution. To use them, you need to cut on a groove in every corner by passing the framework by means of a table saw in a 45-degree angle. Prepare the splines by cutting hardwood to the identical thickness as the saw blade, and paste one to the groove in every corner. Trim it with a handsaw once the glue sets, then sand it flush.