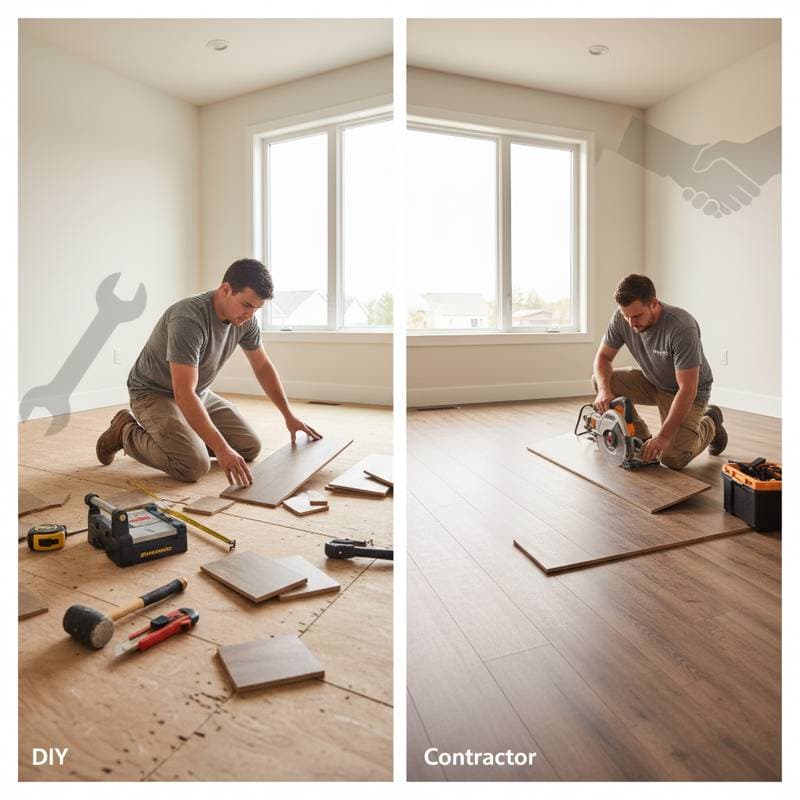
DIY or Professional: Understanding LVP Flooring Costs and Risks
Homeowners often envision a quick transformation when selecting Luxury Vinyl Plank (LVP) flooring for their spaces. The material delivers the appearance of hardwood with added benefits like water resistance and ease of maintenance. However, the path to installation reveals complexities beyond initial material costs, including labor decisions that impact budget, quality, and longevity.
Appeal of a DIY Flooring Project
LVP attracts homeowners with its straightforward click-lock systems and versatile designs. Shoppers encounter displays highlighting durability against scratches and spills, all at a fraction of solid wood prices. This combination inspires plans for weekend renovations that refresh rooms without extensive disruption.
Yet, successful outcomes demand attention to detail. Homeowners must account for room-specific challenges, such as uneven surfaces or intricate layouts, to prevent issues that compromise the final result. Preparation sets the foundation for a seamless installation.
Analyzing Total Installation Expenses
Professional LVP installation generally costs between $4 and $8 per square foot, factoring in material quality and site conditions. Opting for DIY reduces this to $2 to $4 per square foot by removing labor fees. These figures provide a starting point, but additional elements alter the overall financial picture.
Overlooked expenses include:
- Tools such as tapping blocks, pull bars, utility knives, and jigsaws, totaling $100 to $300 for essential items.
- Subfloor repairs with leveling compounds or moisture barriers, adding $1 to $2 per square foot.
- Extra materials to cover errors, recommending 5 to 10 percent above measured square footage.
Professionals minimize these through efficient practices and access to advanced equipment. They address subfloor imperfections that DIY efforts might miss, preventing future repairs that escalate expenses.
Assessing Required Skills
Manufacturers emphasize LVP's user-friendly installation, but variations in locking mechanisms require specific techniques. Some systems involve gentle tapping, while others need precise angling to engage fully. A minor misalignment early on disrupts subsequent rows, leading to rework.
Experienced DIYers manage simple rectangular rooms effectively. Complex areas with obstacles like cabinets or thresholds demand advanced cuts and adjustments. Professionals excel in staggering joints for stability and creating clean edges around fixtures, ensuring a uniform appearance.
In moisture-sensitive locations such as kitchens or laundry rooms, experts apply protective measures like sealants. These steps enhance performance and safeguard against environmental damage.
Physical and Safety Considerations
The installation process exerts demands on the body, including prolonged kneeling and repetitive motions. Handling heavy plank boxes and operating sharp tools increases strain on joints and muscles. Beginners report discomfort from extended sessions without supportive equipment.
Protective measures mitigate risks: knee pads cushion joints, and stable cutting surfaces prevent accidents. Professionals adhere to protocols that maintain site safety and minimize downtime. Individuals with physical limitations find professional services preserve health while delivering results.
Consequences of Substandard Installation
Proper execution ensures LVP's resilience against wear. Inadequate connections permit water infiltration, fostering mold or deformation. Insufficient expansion spaces along perimeters cause buckling during seasonal changes.
Subfloor irregularities lead to gradual issues like noise or separation. These problems emerge over time, complicating fixes that involve partial disassembly. Early detection through professional assessment avoids such escalations.
Benefits of Professional Services
Engaging certified installers aligns with manufacturer guidelines, preserving warranty coverage. Requirements often include moisture evaluations and precise spacing, which experts verify routinely. This compliance protects against voided protections.
Professionals select appropriate underlayments for acoustic control or vapor resistance, meeting local codes. In demanding environments like high-traffic zones, their methods promote superior adhesion and alignment. The investment yields enhanced durability and reduced maintenance needs.
Scenarios for Successful DIY Installation
DIY suits smaller, uncomplicated spaces such as home offices or powder rooms. Contemporary click-lock designs simplify assembly compared to traditional methods. Resources like video guides support novices in mastering basics.
Possessing basic tools and carpentry familiarity aids execution. Essential preparations involve acclimating materials for 48 hours and verifying subfloor flatness within 3/16 inch over 10 feet. Methodical pacing maintains precision throughout.
Evaluating Long-Term Value
Beyond finances, installation choices influence home appeal and functionality. Professional finishes appeal to prospective buyers, potentially boosting property value. Well-executed DIY projects achieve similar outcomes when flaws remain absent.
LVP outperforms alternatives in lifespan and upkeep, enduring 15 to 25 years with minimal intervention. This reliability benefits households with active lifestyles or multiple occupants, regardless of installation approach.
Avoiding Frequent Errors
Failure to acclimate planks invites contraction problems post-installation. Verify subfloor levels using a long straightedge; apply self-leveling compounds where needed. Renting a moisture meter costs under $50 daily and prevents hidden threats.
Strategic adhesive use at perimeters stabilizes edges without compromising flexibility. Floating configurations facilitate isolated repairs, preserving the majority of the floor intact.
Essential Techniques for Optimal Results
Apply these strategies for any installation:
- Verify measurements before cutting to conserve resources.
- Maintain 1/4-inch expansion gaps at walls for movement accommodation.
- Install moisture barriers in damp-prone areas to block vapor rise.
- Choose underlayment suited to substrate for insulation and noise reduction.
- Design layouts with staggered joints and full-width planks at edges for visual balance.
Ensuring Longevity Through Maintenance
Routine care preserves LVP's appearance and structure. Sweep or vacuum regularly to remove debris that scratches surfaces. Address spills promptly with mild cleaners to avoid residue buildup.
Inspect seams annually for shifts, adjusting as necessary. Avoid dragging heavy furniture; use pads to distribute weight. These habits extend performance, maximizing the flooring's value over decades.