Prepare for Peak Performance: Essential Spring HVAC Checklist
Spring arrives with milder temperatures, offering an ideal opportunity to transition your HVAC system from heating to cooling mode. Many homeowners overlook maintenance until discomfort arises, yet proactive care ensures reliable operation during upcoming heat waves. A thorough tune-up addresses potential issues early, promoting energy savings and system longevity.
This guide provides a step-by-step checklist to ready your HVAC system. Complete these tasks yourself where possible, or consult a professional for complex inspections. Follow these steps to achieve optimal performance and avoid unexpected failures.
The Importance of Spring HVAC Maintenance
HVAC systems operate continuously yet accumulate dust, debris, and wear over time. These factors increase energy consumption and strain components such as compressors and blowers. Without regular attention, minor problems escalate into costly breakdowns during peak summer demand.
Performing maintenance in spring allows technicians greater availability and facilitates prompt part sourcing. Address issues before they worsen, potentially reducing repair expenses by 20 to 30 percent. Moreover, well-maintained systems improve efficiency, lowering annual energy bills by as much as 15 percent through better airflow and reduced operational strain.
Clean components like evaporator coils and filters enable freer air movement, resulting in consistent temperatures and enhanced indoor comfort. Invest time now to safeguard your home's climate control throughout the year.
Step 1: Replace or Clean the Air Filter
The air filter serves as the first line of defense against dust and allergens. A clogged filter restricts airflow, compelling the system to consume more energy and potentially damaging the blower motor.
Locate the filter in the return air duct or furnace housing. Select a filter with a MERV rating of 8 to 13 for balanced filtration without excessive resistance. Replace it every one to three months, or clean reusable models with compressed air or water. This action alone can improve system efficiency by 5 to 15 percent.
Step 2: Clean Supply and Return Vents
Blocked vents hinder proper air distribution, leading to uneven cooling and higher energy use. Furniture, curtains, or accumulated dust often obstruct these openings.
Examine all supply and return vents throughout your home. Relocate any obstructing items and use a soft brush or vacuum attachment to remove surface debris from grilles. For thorough cleaning, detach the covers, wash with warm soapy water, and allow complete drying before reattaching.
Enhanced airflow from this step not only boosts comfort but also elevates indoor air quality by reducing trapped pollutants.
Step 3: Inspect and Calibrate the Thermostat
An inaccurate thermostat causes the system to cycle inefficiently, resulting in temperature fluctuations and unnecessary runtime. Older models may drift over time, affecting precision.
Verify that your thermostat displays the correct room temperature using a separate thermometer. For programmable units, confirm settings align with your schedule. Consider upgrading to a smart thermostat if yours lacks modern features; these devices optimize operation based on occupancy and weather data.
Proper calibration ensures the system activates only when needed, contributing to energy conservation and precise climate control.
Step 4: Check Drain Lines and Condensate Pans
Air conditioners dehumidify indoor air, producing condensate that must drain properly. Clogged lines lead to water backups, fostering mold and risking structural damage.
Access the drain line near the indoor coil and flush it with a mixture of one part white vinegar to ten parts water. Inspect the condensate pan for residue or cracks; clean with a mild solution if necessary. Persistent issues warrant professional intervention to prevent overflows.
Maintaining clear drainage protects your home from moisture-related problems and ensures efficient humidity control.
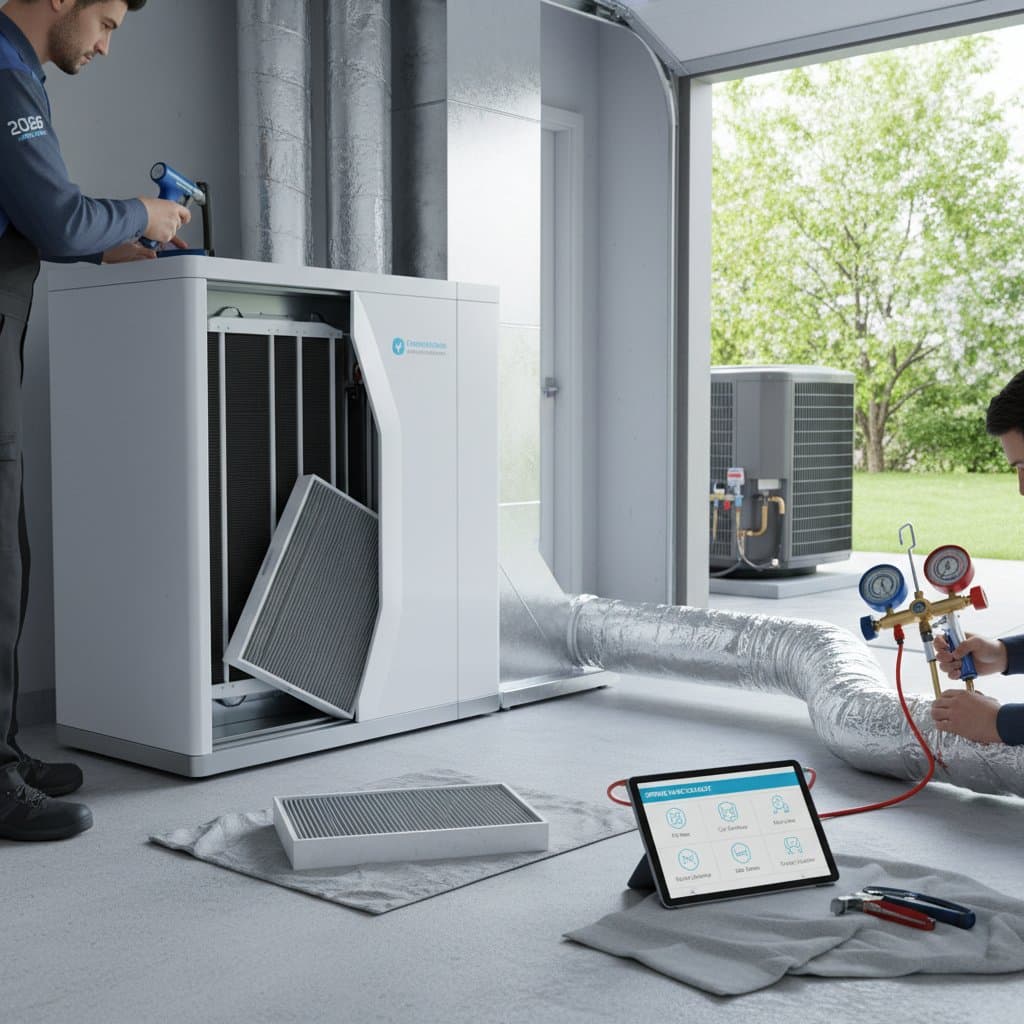
Step 5: Examine Coils and Electrical Connections
Dirty evaporator and condenser coils reduce heat transfer efficiency, forcing the system to labor longer. Loose electrical wiring poses safety risks and can interrupt operation.
Turn off power to the unit before inspecting. Gently clean outdoor condenser coils with a garden hose, avoiding high pressure. For indoor coils, use a no-rinse coil cleaner if accessible. Tighten any visible loose connections and check for frayed wires.
These checks prevent efficiency losses and electrical hazards, extending component lifespan.
Step 6: Listen for Unusual Noises and Inspect Moving Parts
Strange sounds indicate underlying issues, such as imbalanced fans or deteriorating belts. Ignoring them accelerates wear and may lead to complete failure.
Operate the system and note any grinding, squealing, or banging. Inspect belts for cracks and lubricate motors with manufacturer-recommended oil if applicable. Worn parts, like a blower motor, can cost $300 to $600 to replace if neglected.
Early detection allows for simple fixes, preserving quiet and reliable performance.
Step 7: Test Refrigerant Levels and System Pressures
Low refrigerant diminishes cooling capacity and strains the compressor. Leaks often develop gradually, requiring professional detection.
Observe for signs like warm air from vents or ice on coils. Professionals use gauges to measure pressures and recharge if needed, ensuring compliance with environmental regulations. Avoid DIY refrigerant handling due to its complexity and legal restrictions.
Balanced refrigerant maintains optimal cooling without excessive energy draw.
Step 8: Seal and Insulate Ductwork
Leaky ducts waste up to 30 percent of conditioned air, causing hot spots and elevated bills. Poor insulation exacerbates energy loss in unconditioned spaces.
Survey ducts in attics, basements, and crawlspaces for gaps or separations. Apply mastic sealant or foil tape to seal joints, then wrap exposed sections with fiberglass insulation. Professional duct sealing for an average home costs $200 to $800 and recoups investment through savings.
Sealed ducts deliver consistent temperatures and maximize system efficiency.
Step 9: Clean the Outdoor Unit
The outdoor condenser unit accumulates dirt, leaves, and debris, impeding heat dissipation. Overheating reduces cooling effectiveness and shortens unit life.
Clear vegetation within two feet of the unit and remove debris from the coil fins. Straighten bent fins with a fin comb if necessary. Ensure the fan spins freely without obstruction.
A clean outdoor unit operates more efficiently, especially during humid conditions.
Step 10: Enhance Indoor Air Quality
Spring pollen and indoor pollutants challenge air purity. Integrating filtration upgrades complements basic maintenance.
Install whole-home dehumidifiers to manage moisture or UV purifiers to combat microbes. Advanced electronic air cleaners capture fine particles for allergy sufferers. These additions, priced from $400 to $1,500, integrate seamlessly with existing HVAC setups.
Improved air quality promotes health and reduces system strain from contaminants.
Practical Strategies for Ongoing Maintenance
Establish monthly reminders for filter inspections and vent checks to sustain performance. Maintain a log of service dates and observations to identify patterns early. Monitor utility bills for spikes, which may indicate leaks or inefficiencies.
Schedule annual professional inspections before seasonal extremes to minimize disruptions. These habits ensure your HVAC investment delivers lasting value.
Sustain Comfort and Efficiency Year-Round
With your HVAC system tuned and verified, expect steadier temperatures, reduced noise, and lower operating costs. Routine care prevents emergencies and preserves equipment integrity.
Continue filter replacements and seasonal checks to maximize benefits. Your proactive efforts yield cleaner air, financial savings, and dependable home comfort across all seasons.