Assessing the Value of a DIY Backsplash
Homeowners often wonder if installing a kitchen backsplash themselves justifies the effort. The decision hinges on individual circumstances, including available time, existing skills, and financial priorities. While a DIY approach promises significant savings, it involves meticulous planning to avoid common pitfalls that could increase expenses.
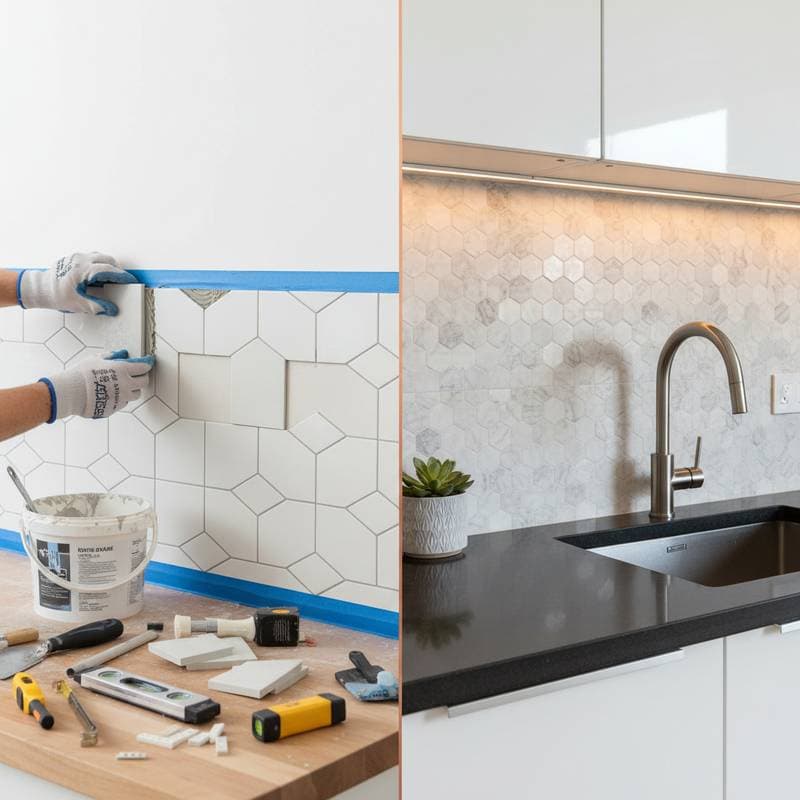
Many projects begin with enthusiasm for a simple update, yet the process reveals layers of detail. Proper execution demands steady hands and attention to alignment. Understanding the full scope ensures a positive outcome rather than frustration.
Reasons to Opt for DIY Installation
Cost reduction and design freedom drive most homeowners toward DIY backsplash projects. Self-installation eliminates labor fees, potentially saving several hundred dollars. Additionally, it enables customization, from selecting subway tiles for a timeless look to arranging glass mosaics for a modern accent.
The personal achievement adds intangible benefits. A hands-on project infuses the kitchen with unique character. However, success relies on thorough preparation, including surface cleaning and precise measurements, to prevent issues like grout cracks or misaligned patterns.
Breaking Down the Time Investment
Expect the DIY backsplash to span multiple days, even for those with some experience. Preparation alone consumes considerable effort, followed by installation and finishing steps. A detailed timeline helps set realistic expectations.
- Prepare the Surface (2 to 3 hours): Remove existing coverings, clean thoroughly, repair imperfections, and verify flatness.
- Plan the Layout (2 hours): Arrange tiles without adhesive to test patterns and adjust for outlets or edges.
- Apply Tiles (6 to 10 hours): Spread thin-set mortar, position tiles sequentially, and cut pieces for precise fits.
- Apply Grout (2 to 3 hours): Wait for mortar to set, then mix and spread grout evenly after the overnight cure.
- Finish and Clean (2 hours): Remove excess grout, apply sealant where needed, and restore fixtures.
In total, allocate two to three days, accounting for drying periods. Smaller areas might fit into a weekend with efficient organization.
Detailed Cost Comparison
Materials form the core of DIY expenses, typically ranging from $100 to $750 for a standard kitchen area. Ceramic tiles cost $2 to $10 per square foot, while premium options like natural stone reach $15 to $30. Add $20 to $50 for adhesive, grout, and tools such as a tile cutter or level.
Professional services, by contrast, total $625 to $1,500, incorporating $25 to $50 per square foot for labor. This covers expert handling of challenges like irregular walls or custom cuts. The premium ensures durability but reduces funds available for other renovations.
Situations Favoring Professional Expertise
Certain conditions make hiring a specialist the wiser choice. Intricate designs, such as herringbone patterns or large-format tiles, benefit from professional precision. Uneven surfaces or integration with appliances also demand advanced skills to achieve seamless results.
Experts arrive with essential equipment, including wet saws and laser levels, minimizing errors. Their work complies with building standards, particularly for heat-resistant materials near stoves. For projects exceeding 50 square feet or involving valuable materials, the investment secures long-term reliability.
Impact on Home Value and Resale
A thoughtfully installed backsplash enhances kitchen appeal, influencing buyer perceptions. It signals thoughtful maintenance and boosts market value by 60 to 80 percent of the installation cost. Neutral, high-quality finishes attract broader interest in competitive markets.
Poor execution, however, detracts from the home's allure. Visible flaws suggest deferred upkeep, potentially lowering offers. If selling within a few years, prioritize professional quality to maximize returns and avoid corrective costs.
Essential Safety Measures
Backsplash work involves basic risks, but adherence to protocols keeps the process secure. Electricity poses the primary hazard near counter outlets.
- Disconnect power at the breaker before any electrical adjustments.
- Don safety glasses during cutting to shield against fragments.
- Ensure adequate airflow when handling chemicals like grout or sealants.
- Select fire-resistant tiles if positioning near cooking surfaces, per local regulations.
- Maintain an organized area to prevent slips or inhalation of particles.
These practices transform a routine task into a controlled, effective endeavor.
Weighing Effort Against Savings
Financially, DIY stands out for budget-conscious individuals, with potential savings up to $1,000. Materials represent the bulk of outlay, while time equates to an opportunity cost. Professionals complete the job in one day, freeing weekends for other pursuits.
For those who value skill-building, the experience proves enriching. Errors, such as improper adhesion, might necessitate repairs costing as much as initial savings. Evaluate personal tolerance for detailed work before committing.
Practical Techniques for Optimal Results
Preparation elevates DIY outcomes from adequate to exceptional. Select materials suited to the space, like peel-and-stick options for beginners or porcelain for durability.
- Purchase 10 percent more tiles to accommodate waste and spares.
- Initiate layout from the room's center for balanced symmetry.
- Incorporate metal trim along edges for a polished appearance.
- Verify horizontality with a level after every few rows.
- Maintain uniform grout lines, typically 1/8 inch, for a cohesive look.
Patience during these steps yields professional-grade finishes without the associated expense.
Long-Term Care for Lasting Beauty
Sustained upkeep preserves the backsplash's vibrancy and functionality. Address spills immediately with mild soap to avert discoloration on grout or tiles.
Avoid abrasive cleaners that erode sealants. For natural stone, reapply protection yearly to resist stains and moisture. Routine wiping prevents buildup, ensuring the feature remains a focal point.
Realizing the Rewards of Your Choice
Approaching a backsplash project with informed strategy unlocks its full potential. DIY suits those prepared for the commitment, delivering savings and personalization. Professional assistance provides efficiency for complex needs.
Ultimately, either path elevates the kitchen's role in daily life. The result reflects intentional design, fostering enjoyment in a space central to home routines.