Spring HVAC Checklist to Slash Energy Bills
As warmer weather approaches, your HVAC system transitions from heating to cooling duties. Homeowners often overlook this shift until discomfort arises, leading to inefficiency and higher costs. This guide provides a comprehensive checklist to prepare your system for spring, ensuring optimal performance, reduced energy use, and prolonged lifespan. Follow these steps to maintain comfort and achieve savings of up to 30 percent on energy bills.
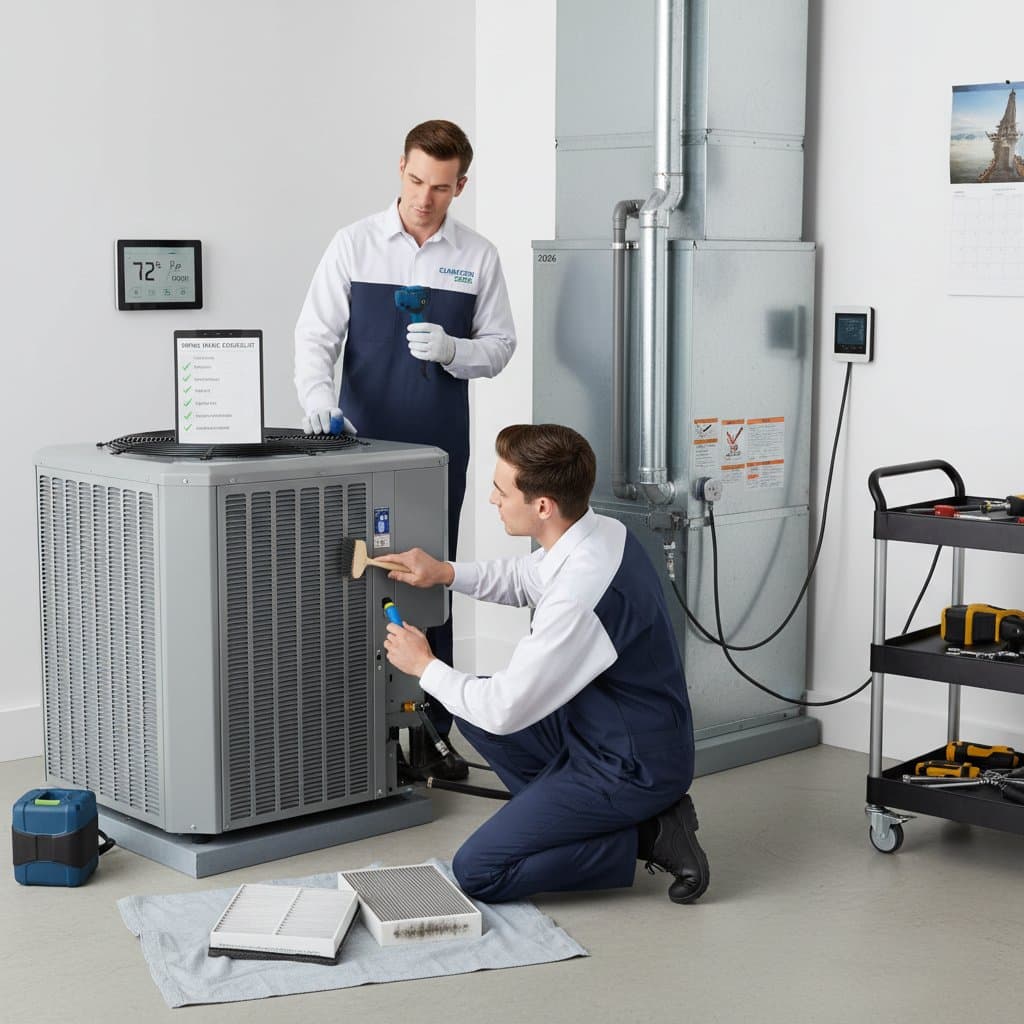
Step 1: Replace or Clean Air Filters
Air filters capture dust, pollen, and debris, but they become clogged over time. A dirty filter restricts airflow, compels the blower to labor excessively, and elevates energy consumption. Regular maintenance in this area restores efficiency and safeguards system components.
Actions to take:
- Inspect filters at least once per month during peak seasons.
- Replace disposable filters or clean reusable ones every one to three months, depending on usage.
- Select filters with MERV ratings between 8 and 12 to balance filtration strength and airflow.
Disposable filters cost between 10 and 30 dollars each, while high-efficiency options provide superior air quality benefits. This task requires only 5 to 10 minutes and can reduce energy use by up to 15 percent immediately.
Step 2: Clean Evaporator and Condenser Coils
Coils in your HVAC system transfer heat, but dirt accumulation hinders this process. Evaporator coils inside the unit and condenser coils outside collect grime, ice, or debris, which diminishes cooling capacity and strains the compressor. Cleaning these components enhances heat exchange and prevents overheating.
Actions to take:
- Turn off power to the unit before starting.
- Use a soft brush or coil cleaner to remove surface dirt from indoor evaporator coils.
- Gently rinse outdoor condenser coils with a garden hose, avoiding high pressure that could bend fins.
- Straighten any bent fins with a fin comb for optimal airflow.
Cleaning supplies cost under 20 dollars. Allocate 30 to 45 minutes for this step, which can improve efficiency by 10 to 20 percent and avert premature failures.
Step 3: Inspect Ductwork for Leaks and Blockages
Duct systems deliver conditioned air throughout your home, yet leaks or obstructions waste energy. Research indicates that typical residences lose 20 to 30 percent of air through unsealed joints or damaged sections. Addressing these issues ensures even distribution and reduces operational strain.
Actions to take:
- Examine visible ducts in attics, basements, and crawl spaces for separations or holes.
- Apply mastic sealant or aluminum foil tape to seal leaks; avoid cloth-backed duct tape, which deteriorates.
- Vacuum dust from supply and return vents to clear blockages.
- Schedule a professional duct leakage test if extensive issues are suspected.
Materials for basic sealing cost less than 50 dollars, while professional services range from 300 to 700 dollars. This process takes 2 to 3 hours and promotes balanced temperatures across rooms.
Step 4: Calibrate and Upgrade the Thermostat
The thermostat controls system cycles, and inaccuracies lead to uneven cooling or excessive runtime. An outdated or malfunctioning unit may cause short cycling, where the system turns on and off too frequently. Proper calibration optimizes operation and integrates with modern energy-saving features.
**Actions to take:**n- Verify thermostat accuracy against a separate thermometer; adjust if readings differ by more than one degree.
- Clean sensor contacts and replace batteries in programmable models.
- Consider upgrading to a smart thermostat for automated scheduling and remote control.
Basic calibration requires no cost beyond time, about 15 minutes, while smart models start at 100 dollars. This upgrade can yield 10 to 15 percent savings through precise temperature management.
Step 5: Check Drain Lines and Pans
During cooling, moisture condenses on coils and drains away to prevent water buildup. Blockages in lines or pans result in overflows, potential mold, and structural damage. Routine inspection keeps the system hygienic and functional.
Actions to take:
- Identify the condensate drain line near the indoor coil, often a PVC pipe.
- Flush the line with a solution of warm water and vinegar to dissolve residue.
- Examine the drain pan for corrosion or pooled water; replace if necessary.
- Install a secondary drain pan under the unit for added protection.
Supplies cost under 10 dollars, and the task takes 15 to 20 minutes. Preventive care here avoids expensive repairs and maintains healthy indoor air.
Step 6: Inspect Electrical Components
Wiring, capacitors, and relays power your HVAC, but wear exposes risks like shorts or failures. Spring checks identify frayed connections or corroded terminals before they escalate. Safe electrical integrity supports reliable startup and operation.
Actions to take:
- Disconnect power and inspect wires for insulation damage or loose terminals.
- Tighten connections and clean contacts with a dry cloth.
- Test capacitors with a multimeter if experienced; otherwise, consult a professional.
- Replace any suspect components to prevent breakdowns.
Tools and parts cost 20 to 50 dollars. Spend 20 to 30 minutes on this, ensuring safety and extending system reliability.
Step 7: Lubricate Moving Parts
Fans, motors, and blowers generate friction when unlubricated, raising noise and energy demands. Proper lubrication minimizes resistance and heat buildup. This maintenance preserves mechanical health across seasons.
Actions to take:
- Refer to the owner’s manual for specific lubrication ports on motors and bearings.
- Apply manufacturer-recommended oil sparingly to avoid excess that attracts dirt.
- Wipe away old lubricant before adding fresh amounts.
Lubricants cost under 10 dollars, with the process taking 10 to 15 minutes. Benefits include quieter performance and reduced wear on vital parts.
Step 8: Test System Operation
After completing prior steps, a full test verifies overall functionality. Running the system reveals issues like refrigerant leaks or sensor faults early. This final check confirms readiness for summer demands.
Actions to take:
- Restore power and set the thermostat to cool mode.
- Observe startup: listen for unusual sounds and monitor airflow from vents.
- Measure temperature drop across the evaporator coil; it should be 15 to 20 degrees Fahrenheit.
- Run a complete cycle and note any error codes on digital displays.
No additional cost beyond time, approximately 30 minutes. Testing identifies lingering problems and ensures peak efficiency.
Step 9: Evaluate Insulation and Air Sealing
Effective insulation retains conditioned air, reducing the workload on your HVAC. Gaps around doors, windows, and attics allow infiltration of warm outdoor air. Enhancing the building envelope amplifies system performance.
Actions to take:
- Measure attic insulation; aim for 10 to 14 inches depending on climate.
- Apply caulk to cracks and weatherstripping to doors and windows.
- Add insulation to walls or floors if accessible.
- Install sweeps under exterior doors to block drafts.
Sealing materials cost under 100 dollars, with insulation at 1 to 2 dollars per square foot. Dedicate 2 to 4 hours for sealing or more for insulation. These improvements cut HVAC runtime by up to 25 percent.
Troubleshooting Common HVAC Issues
Even with preparation, issues may arise. Use this table to diagnose and address problems quickly.
| Problem | Likely Cause | Quick Fix |
|---|---|---|
| Weak airflow | Dirty filter or blocked vents | Replace filter, clear obstructions |
| System short cycles | Thermostat issues or dirty coils | Recalibrate thermostat, clean coils |
| Warm air output | Low refrigerant or soiled coils | Schedule technician for refrigerant |
| Unusual noises | Loose parts or unlubricated bearings | Tighten components, add lubricant |
| High indoor humidity | Clogged drain or undersized system | Flush drain line, assess capacity |
Practical Strategies for Long-Term Efficiency
Track maintenance in a log to stay proactive. Clear vegetation and debris from the outdoor unit, maintaining two feet of space for airflow. Position shades or low shrubs to shield the condenser from direct sun without impeding ventilation. Review monthly energy statements for trends indicating needed adjustments.
Sustaining HVAC Performance Year-Round
Investing time in spring preparation pays dividends through reliable cooling and lower bills. These steps not only optimize your current system but also inform decisions about upgrades or replacements. Consult professionals for complex tasks to maximize safety and effectiveness.