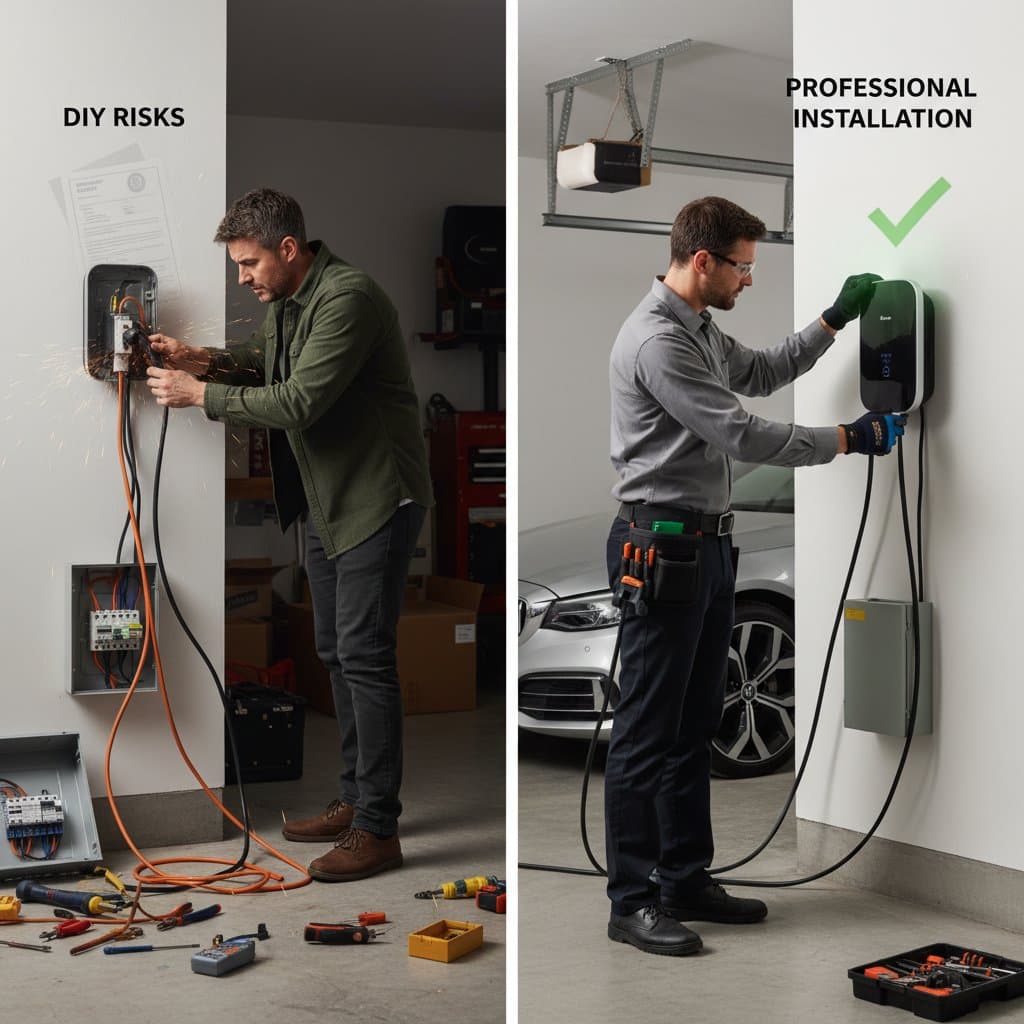
EV Charger DIY: Risks vs Pro Safety Wins
If you have recently joined the growing number of electric vehicle owners, you have probably noticed how convenient it would be to charge your car at home. No more searching for public stations or waiting in line for a plug. The idea of installing an EV charger yourself might even sound tempting, especially if you enjoy weekend projects. Before you grab your toolbox and start rewiring your garage, understand what is really involved. Installing a home EV charger is not like swapping out a light fixture. It is a high-powered electrical upgrade that can go wrong in expensive, dangerous, or even legally complicated ways if not handled correctly.
The DIY Temptation
You might think, "How hard can it be?" After all, you can buy a Level 2 charger online for anywhere between $300 and $900, and the instructions often look straightforward. If you already have a 240-volt outlet in your garage, the installation might seem as easy as plugging it in. For some setups, that is true. Portable plug-in units designed for a standard dryer outlet can be self-installed safely if your existing circuit meets the amperage requirements. For most homeowners, however, the process is more complex.
A hardwired Level 2 charger usually requires a dedicated circuit rated between 30 and 60 amps, thicker gauge wiring, and sometimes a subpanel upgrade. These are not small adjustments. They come with real risks if you lack full training in electrical work.
What DIY EV Charger Installation Actually Involves
Before you start, examine what a proper installation includes. Professional electricians follow a detailed sequence to ensure both safety and performance:
- Electrical load assessment to confirm your main panel can handle the additional current draw.
- Dedicated circuit installation with the correct breaker size and wire gauge.
- Ground fault protection to prevent shocks or short circuits.
- Proper conduit and wiring rated for outdoor or garage environments.
- Charger mounting and weatherproofing to protect the unit.
- Code compliance verification and possibly a permit inspection.
For a homeowner attempting this without professional experience, even one missed step can have serious consequences. Overloaded circuits can lead to tripped breakers, melted insulation, or electrical fires. Such issues are not just inconvenient; they are potentially life-threatening.
The Real Costs Behind DIY Installation
At first glance, doing it yourself might seem cost-effective. Consider the real numbers: you could spend $400 to $900 on the charger and $100 to $200 on wiring and supplies. A professional electrician might quote $800 to $2,000 for a full installation, depending on distance from the panel, wall type, and any upgrades required. You might save a few hundred dollars upfront.
If something goes wrong, however, those savings can disappear instantly. A botched installation can void the charger warranty or even your homeowner insurance. Repairs to a damaged electrical system can easily exceed $3,000, not to mention the cost of replacing the charger itself. In short, what looks like a budget-friendly DIY project can quickly turn into a high-stakes gamble.
Legal and Insurance Implications You Should Know
Home electrical work is regulated for a reason. Many local codes require a licensed electrician for installations involving high-amperage circuits. If you skip the permit process or perform work that does not meet code, you could face fines or fail an inspection when you sell your home. Even more concerning, your insurance provider might deny claims related to electrical damage if the work was unpermitted or improperly done.
These are not just bureaucratic hurdles. They are protections designed to keep your home and family safe. A professional electrician ensures the installation is compliant, inspected, and properly documented, which can add value and peace of mind.
When DIY Might Be Reasonable
There are a few situations where a DIY approach can work safely. If your charger is a plug-in model and you already have a compatible 240-volt outlet on a dedicated circuit, installing it yourself might be fine. Mount the unit, secure the cable, and test the connection following the manufacturer instructions. Just ensure the outlet has a breaker rated correctly for your charger current draw. If you are uncertain, have an electrician verify it before use.
Another safe DIY task is site preparation. Clear wall space, install cable hooks, or even paint the area to create a clean, organized charging zone. These steps save time for the professional and keep the project efficient without touching any electrical components.
Why Pro Installation Wins on Safety and Longevity
A licensed electrician brings more than technical skill to the job. They bring experience with local codes, knowledge of load balancing, and access to quality materials. They know how to size wiring to minimize voltage drop, protect against moisture in outdoor spaces, and secure permits that keep your installation legal.
Professionals also test your system thoroughly before connecting power. They check grounding continuity, measure voltage under load, and verify that the circuit breaker trips correctly. These small details make a major difference in both safety and charger performance.
When installed correctly, a Level 2 charger should last 10 to 15 years with minimal maintenance. A professional ensures your setup is designed for long-term use, which means fewer headaches and a better return on your investment.
Common Mistakes DIY Installers Make
If you are still considering a DIY route, keep an eye out for these common pitfalls:
- Using undersized wire that overheats under heavy load.
- Skipping grounding checks that protect against shocks.
- Installing on a shared circuit that cannot support the added draw.
- Ignoring outdoor ratings for weather-exposed components.
- Failing to secure permits, which can complicate future home sales.
These mistakes are not trivial. They can damage your electrical system or reduce your charger efficiency.
Pro Tips for Success
If you hire a professional, you can still stay involved and make smart choices. Here are a few ways to maximize your project:
- Ask for a load calculation to understand your home electrical capacity.
- Request a labeled diagram of the new circuit for future reference.
- Choose a charger with smart features like scheduling or energy monitoring.
- Plan for the future by installing a conduit large enough for possible upgrades.
- Keep all documentation for insurance and resale value.
These steps help you stay informed while leaving the complex electrical work to the experts.
Living with Your New Charging Setup
Once your charger is safely installed, enjoy the everyday convenience it brings. You will wake up to a fully charged car, skip the public charger queues, and reduce your energy costs by taking advantage of off-peak rates. Make a habit of inspecting the cable for wear, keeping the plug clean, and testing the breaker occasionally. These small habits extend your charger life and maintain safety.
Steps to Secure Your EV Charging Future
To move forward, evaluate your home electrical setup with a professional consultation. Select a charger that matches your vehicle needs and budget. By prioritizing expert installation, you invest in a reliable system that supports your electric vehicle lifestyle for years to come.