Understanding Winter Pipe Bursts and the Value of Prevention
Homeowners often face unexpected challenges during cold weather, such as water damage from burst pipes. These incidents occur when freezing temperatures cause water inside pipes to expand, exerting pressure that leads to cracks or ruptures. Even modern homes prove susceptible if preventive measures remain overlooked.
Repairs for a single burst pipe typically range from $300 to $1,500, excluding additional costs for damaged flooring or walls. In contrast, basic preventive actions require less than $100 in supplies and a few hours of effort. This checklist serves as a reliable strategy to maintain plumbing integrity and preserve home comfort.
The Mechanics of Pipe Freezing
Water expands by approximately nine percent when it freezes, creating internal pressure up to 2,000 pounds per square inch in confined pipes. Metal pipes withstand less stress than plastic ones, but both yield under prolonged exposure. Damage often remains hidden until leaks appear, amplifying repair expenses through secondary issues like mold growth.
Prevention focuses on heat retention and flow maintenance. By addressing vulnerabilities early, homeowners reduce risks and enhance overall energy efficiency. The following steps provide a comprehensive guide to winter readiness.
Comprehensive Winter Pipe Protection Checklist
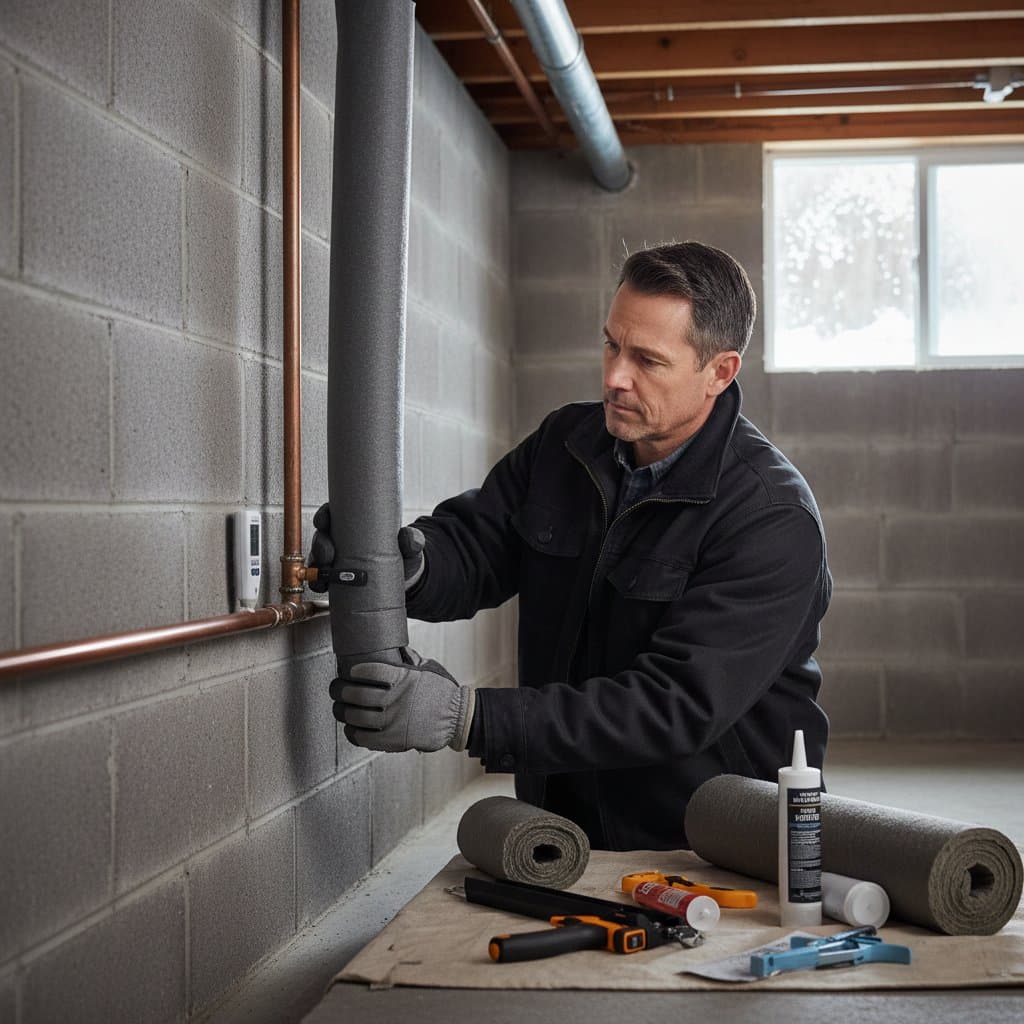
1. Inspect and Insulate Exposed Pipes
Begin with a thorough inspection of areas prone to cold infiltration, including under sinks, in basements, crawl spaces, attics, and garages. Identify pipes that feel cooler than surrounding air or run parallel to exterior walls, as these locations experience rapid temperature drops.
Apply foam pipe insulation or fiberglass sleeves to cover these sections. Such materials cost between $1 and $3 per linear foot and install easily with adhesive or zip ties. For unheated zones with metal pipes, install heat tape equipped with a thermostat; this device activates automatically below set temperatures. Connect it to a grounded outlet and adhere strictly to installation guidelines to ensure safety.
2. Seal Gaps and Air Leaks Around Pipes
Gaps where pipes penetrate walls or floors allow cold air to enter, accelerating freezing risks. Examine entry points to unheated areas or outdoors, particularly near brick or siding interfaces.
Fill these openings with expanding foam sealant or silicone caulk, which expands to create airtight barriers. This process not only protects pipes but also minimizes heat loss throughout the home, potentially lowering heating costs by five to ten percent. Allow sealants to cure fully before testing for drafts.
3. Maintain Water Flow During Cold Spells
In anticipation of subfreezing temperatures, allow faucets on exterior walls or in cooler rooms to drip at a slow rate. Continuous movement prevents water from stagnating and forming ice crystals.
Target faucets in basements, laundry rooms, or near uninsulated walls. The resulting water usage remains minimal, far outweighed by savings from avoided repairs. Monitor flow to ensure it remains steady without waste.
4. Circulate Warm Air to Pipe Areas
For sinks on exterior walls in kitchens or bathrooms, open underlying cabinet doors to expose pipes to indoor warmth. This allows heated room air to reach otherwise isolated sections.
Supplement with a small, oscillating fan directed toward the area during extreme cold. Such circulation equalizes temperatures and requires no additional energy beyond standard heating. Repeat this practice nightly when forecasts predict lows below 32 degrees Fahrenheit.
5. Optimize Thermostat Management
Consistent indoor temperatures form the foundation of pipe protection. Set the thermostat to maintain at least 55 degrees Fahrenheit, particularly overnight or during absences.
Programmable models offer precision; configure them to sustain warmth without excessive spikes. Avoid complete shutdowns, as temperature fluctuations increase freezing probabilities. Regular checks ensure the system operates efficiently.
6. Prepare Outdoor Water Lines
Outdoor faucets and hoses face the highest freeze risks. Detach all garden hoses, drain residual water by elevating one end, and store indoors to prevent cracking.
Locate and close interior shut-off valves for each exterior spigot, then open the outdoor faucet to expel trapped water. For non-frost-proof bibs, apply insulated covers costing $5 to $10 each. These foam enclosures provide an extra layer of thermal protection.
7. Test Interior Shut-Off Valves
Quick access to shut-off valves limits damage in emergencies. Identify the main water valve, typically near the water meter or entry point, and verify its operation by turning it slowly.
Test zone-specific valves for outdoor lines or basements as well. If valves resist movement, apply a lubricant like pipe dope to restore function without forcing components. Document locations for family reference.
8. Enhance Heat in Vulnerable Zones
Areas like crawl spaces or garages often harbor persistent cold spots. Install a low-wattage space heater or heat lamp designed for enclosed use in these regions.
Position devices at least three feet from combustibles and use automatic shut-off models. For permanent solutions, add rigid foam insulation boards to walls, which reflect heat and reduce conduction losses. These upgrades yield long-term benefits for both pipes and utility expenses.
Addressing Potential Winter Plumbing Problems
Preparation reduces incidents, yet vigilance remains essential. Diminished water pressure signals possible ice buildup; respond by increasing faucet drip and applying external warmth.
Use a hair dryer on low heat or wrap the pipe with heated towels to thaw gently. Avoid direct flames or high-heat tools, which risk pipe distortion or fire. If issues persist, consult a professional plumber to assess deeper blockages.
Persistent leaks or unusual noises warrant immediate inspection. Document symptoms, including affected locations and timelines, to aid diagnosis. Early intervention prevents escalation into major floods.
Sustaining Pipe Health Year-Round
Regular maintenance extends beyond winter, ensuring plumbing reliability across seasons. Schedule annual inspections to catch wear early, and update insulation as homes age.
These habits not only avert disasters but also promote efficient water use and lower energy demands. Homeowners who invest time in such routines enjoy peace of mind and substantial financial protection against unforeseen cold-weather threats.