Winter Energy Audits: Reduce Heating Bills by Up to 30 Percent
Homeowners face rising heating costs each winter, yet many overlook simple ways to improve efficiency. A thorough energy audit identifies heat loss sources, from drafty windows to inefficient appliances, and guides targeted improvements. These steps not only lower utility bills but also enhance comfort and home value.
Professional audits often reveal savings potential of 10 to 30 percent on heating expenses. Even basic DIY efforts yield noticeable results. This guide provides a structured approach to conducting your own audit, focusing on high-impact areas during the colder months.
Step-by-Step DIY Energy Audit Checklist
Gather essential tools: a notebook for notes, a flashlight for dark spaces, and incense sticks or a smoke pencil to detect air movement. Perform the audit on a windy, cold day for accurate detection. Follow these steps systematically to uncover inefficiencies.
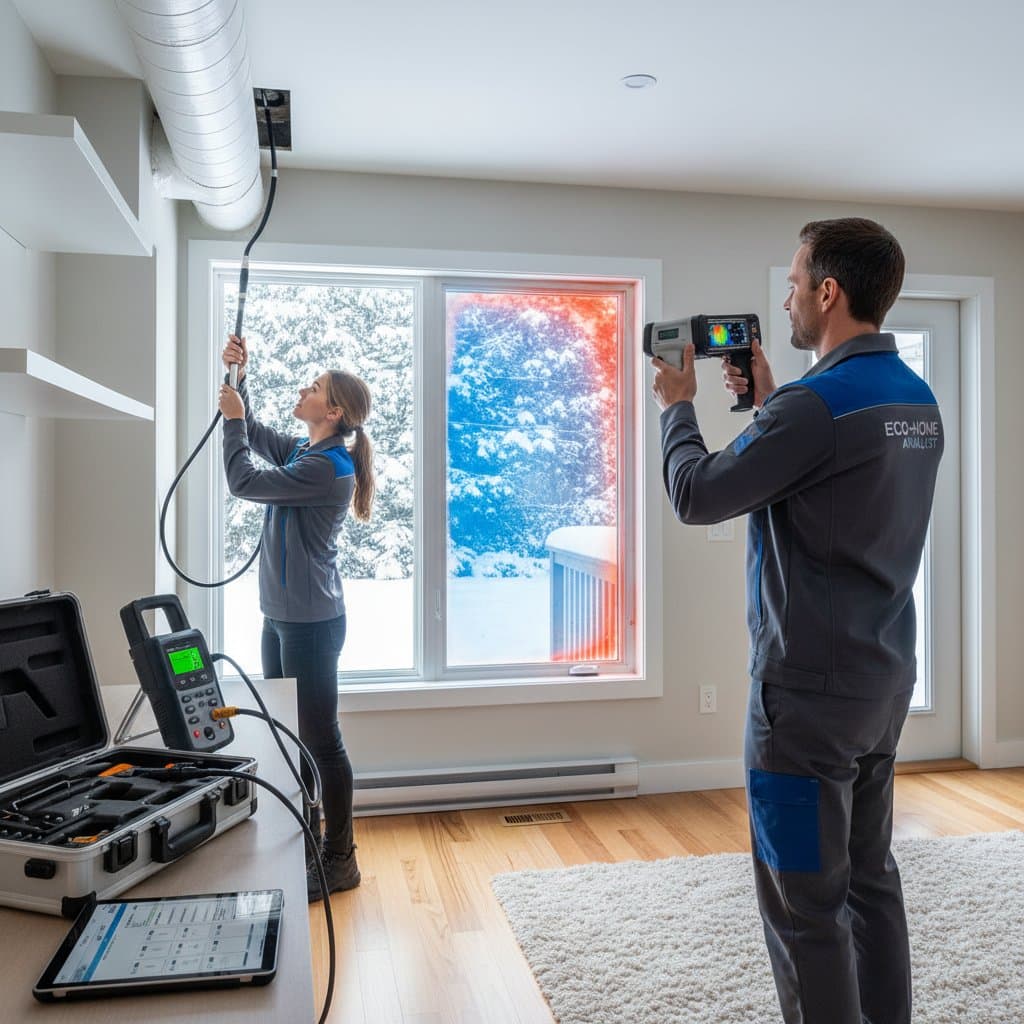
1. Check for Drafts
Drafts allow cold air to infiltrate and warm air to escape, forcing your heating system to run longer. Walk through each room, running your hand along window frames, door edges, electrical outlets, and baseboards. Pay special attention to areas near the floor and ceiling where gaps commonly occur.
To verify leaks, light an incense stick and hold it near potential entry points. If the smoke drifts or disperses unnaturally, air is flowing through. Mark these spots clearly in your notebook, noting the room and surface.
Fix it: Seal small gaps with caulk, which adheres well to stationary surfaces like windowsills. For movable parts like doors, install weatherstripping made of foam, vinyl, or rubber. Larger voids, such as those around pipes or wiring, benefit from expanding foam insulation that fills irregularly shaped spaces upon hardening. These materials are available at hardware stores and require minimal tools for application.
2. Inspect Insulation
Adequate insulation acts as a thermal barrier, keeping heat inside where it belongs. Access your attic via the hatch or pull-down stairs, and examine the basement or crawl spaces if present. Look for signs of settling, damage from pests, or moisture that degrades material over time.
In the attic, sufficient insulation covers the floor completely, obscuring the wooden joists beneath. If you see exposed joists or thin layers, heat escapes rapidly through the roof. Measure depth with a ruler; recommended levels vary by climate but generally range from 10 to 15 inches in northern regions.
Fix it: Supplement existing insulation with fiberglass batts, which fit between joists like puzzle pieces, or blown-in cellulose for irregular areas. Cellulose, made from recycled paper, offers good coverage and fire resistance when treated. Always don protective gear including gloves, long sleeves, a dust mask, and goggles to avoid irritation from fibers and dust. Consult local building codes for safe installation practices, and consider hiring a professional for complex spaces to ensure even distribution.
3. Evaluate Windows
Windows represent a major heat loss point, especially older single-pane types that conduct cold efficiently. Inspect for cracks in frames, loose glazing, or condensation between panes indicating seal failure. Double-pane windows with low-emissivity coatings perform far better, but upgrades take time.
If full replacement exceeds your budget, temporary solutions provide immediate relief. These options trap a layer of still air against the glass, mimicking double-glazing effects.
Fix it: Apply clear plastic film kits that shrink with a hairdryer to create an airtight seal over the entire window. Hang thermal-lined curtains in heavy fabrics that block drafts when closed, or use removable insulation panels filled with foam or bubble wrap. Each method costs between 15 and 50 dollars per window and installs in under an hour. For long-term gains, prioritize south-facing windows first, as they receive the most sunlight and benefit from passive solar heating.
4. Test Your Heating System
An inefficient heating system consumes excess fuel, driving up bills and risking breakdowns. Start by locating your furnace or boiler, typically in the basement or utility room. Check the air filter, a removable panel that traps dust; a dirty one restricts airflow and reduces efficiency by up to 15 percent.
Replace the filter if it appears clogged or discolored, following the unit's specifications for size and type. Listen for rattling, banging, or uneven burner operation during a cycle. Inspect supply vents and registers throughout the home to ensure they remain open and unobstructed by furniture or rugs.
Fix it: Clean or replace filters monthly during heating season to maintain optimal performance. If the system cycles on and off frequently or fails to reach set temperatures, arrange for annual professional servicing. Technicians clean components, check for gas leaks, and calibrate controls, often improving efficiency by 10 percent or more. This investment, usually under 150 dollars, extends equipment life and prevents costly repairs.
5. Examine Ductwork
Ducts distribute heated air, but leaks at joints or seams waste up to 20 percent of energy before it warms living spaces. Hidden in walls, floors, or ceilings, they require careful inspection. Use your flashlight to peer into accessible sections, such as those in the attic or basement, looking for disconnected seams, holes, or crushed areas.
Feel along ducts for temperature drops, indicating escapes. In unconditioned spaces like attics, condensation on ducts signals poor insulation wrapping.
Fix it: Repair leaks by applying foil-backed tape designed for HVAC use, which resists temperature fluctuations, or mastic sealant that forms a durable, flexible bond. Clean the surface first with a brush to remove dust. Avoid cloth-backed duct tape, as it degrades and peels over time. Insulate exposed ducts with fiberglass sleeves or foam boards to prevent further loss. For extensive systems, a professional pressure test identifies hidden issues accurately.
6. Review Lighting and Appliances
While heating dominates winter energy use, lighting and standby appliances add unnecessary draw. Older incandescent bulbs convert most energy to heat rather than light, and devices like chargers or TVs consume power in standby mode, known as vampire energy.
Audit by listing all lights and plug-in devices, noting usage patterns. Calculate potential savings: a single LED bulb uses 75 percent less electricity than its predecessor.
Fix it: Replace bulbs with LEDs rated for energy efficiency, focusing on high-use areas like kitchens and living rooms. Unplug electronics or use power strips with switches to cut idle consumption. Smart power strips automatically shut off peripherals when the main device powers down. These changes, though smaller in scale, compound with heating fixes for comprehensive savings.
Safety and Comfort Considerations
Energy upgrades improve efficiency but demand attention to ventilation and safety. Over-sealing creates airtight conditions that trap moisture, leading to mold growth and poor air quality. Balance improvements with operable windows or exhaust fans in kitchens and bathrooms.
If audits indicate excessive tightness, install a heat recovery ventilator that exchanges stale indoor air for fresh outdoor air while retaining warmth. Monitor humidity levels with a hygrometer, aiming for 30 to 50 percent to avoid dry skin or respiratory issues.
During work, prioritize protection: shut off power at the breaker before handling electrical outlets, and turn off the HVAC system prior to duct repairs. Never block return air vents, as this strains the blower and reduces system balance. Consult professionals for gas appliances to ensure carbon monoxide detectors remain functional.
Pro Tips for Maximum Impact
Begin with high-return areas like drafts and insulation to build quick wins. Document baseline energy use from recent bills, then track changes monthly to measure progress and adjust strategies.
Incorporate technology such as programmable thermostats that lower temperatures by several degrees when the home sits empty, potentially saving 10 percent on heating. Explore local utility rebates for qualified upgrades, including tax credits for insulation or high-efficiency furnaces, which offset costs significantly.
Combine efforts with behavioral changes, like layering clothing or using area rugs over cold floors. Over time, these layered improvements transform energy use, yielding a warmer home and substantial financial relief.
Realizing Long-Term Savings
Implementing a winter energy audit positions your home for sustained efficiency. Each identified fix contributes to lower bills, reduced environmental impact, and greater comfort. Revisit the process annually to adapt to changing needs and technologies, ensuring ongoing benefits through the seasons.